***IMPORTANT NOTE: Existing members will use their same login credentials for Online Branch and our Mobile App, they do not need to re-enroll.***
Enrolling in Online Branch (Desktop)
-
Select First timer user? Enroll now.
-
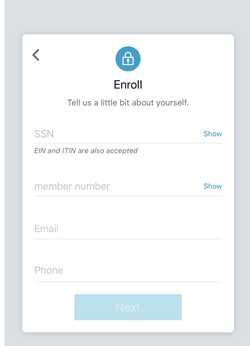
Enter the information requested on the Enroll screen, and then select Next.
-
Enter the verification code sent via SMS, and then select Verify.
-
Read the user agreement, and then select Agree.
-
Create a username and password by entering information in the Username and Password fields, and then select Next.
Enrolling in SFCU Mobile Banking App
-
Download the SFCU Mobile Banking app from your smart phone app store. ***Please note, our mobile app can only be installed in the U.S. Once installed, it will work anywhere in the world.***
-
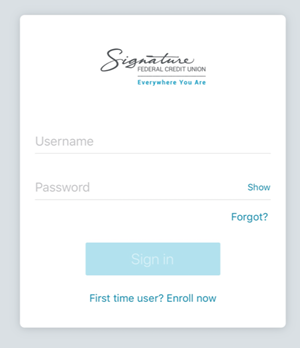
Once downloaded, open the app and select First time user? Enroll now.
-
Enter the information requested on the Enroll screen, and then select Next.
-
When the Secure your Account screen appears, complete the form details to set up two-factor authentication, and select Next.
-
When the User Agreement appears, select Next.
-
Create Username and Password credentials and select Next.
-
Create a Passcode, then confirm it by entering it again on the following screen.
-
Enter your Username.
-
Enter your Password and click Sign In.
-
If this is your first time logging in to the new mobile app, you will be prompted to provide a current email address and a phone number you have access to. Enter these and click Next.
-
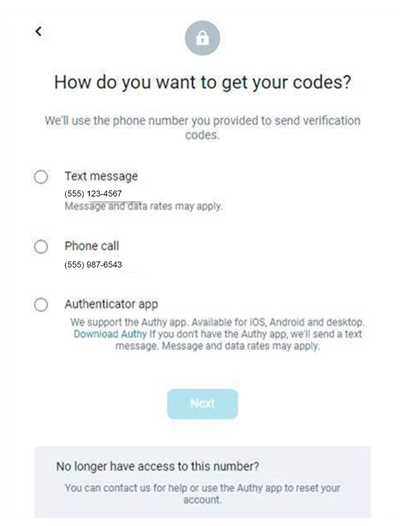
You will be asked how you would like to receive your authentication codes:
-
Text Message (Message and data rates may apply)
-
Phone Call
-
A verification code will be sent to the option you chose previously.
-
Enter the code you received and click Verify.
-
Two-step verification for your account is now enabled.
More than one share/loan needs to be associated with the account to complete a transfer.
How to Create a Transfer:

-
Choose a situation and follow the corresponding steps:
-
ONLINE BRANCH - Select an option:
-
A.) Select Transfers from the Main Menu.
-
B.) Select Make a Transfer in the quick actions section of the dashboard.
-
C.) Select Make a Transfer or Transfer to a Member from the Transfers section of the dashboard.
-
MOBILE APP:
-
Open the app menu and select Transfer.
-
Select Make a Transfer.
-
If prompted, answer the security question and select Submit. If not, continue to the next step.
-
Select the account you want to transfer funds from, and then select an account for the destination.
-
Enter the transfer amount.
-
Choose a situation and follow the corresponding steps:
-
A.) Creating a one-time transfer
-
B.) Creating a one-time scheduled transfer
-
Select More Options.
-
Select the Date field.
-
Select a date for the transfer if you want something other than the Soonest Available default.
-
Select Submit.
-
C.) Creating a recurring transfer
-
Select More Options.
-
Select the Date field.
-
Select a date for the repeating transfer to start.
-
Change the Frequency field.
-
Select Submit.
How to Transfer Funds from One Member to Another on the Mobile App:
-
Choose a situation and follow the corresponding steps:
-
ONLINE BRANCH - Select an option:
-
A.) Accessing transfers from the Main Menu.
-
Select Transfers from the main menu.
-
Select Member Transfer.
-
B.) Accessing transfers from the Transfers section of the dashboard screen.
-
Locate the Transfers section of the dashboard screen.
-
Select Transfer to a Member.
-
C.) Accessing transfers from the quick actions section of the dashboard screen.
-
Locate the quick actions section of the dashboard.
-
Select Transfer to a Member.
-
MOBILE APP:
-
Select the main menu, and then select Member Transfer.
-
Complete the fields in the form:
-
A.) From
-
Selecting this field makes a screen appear where the end users can select from accounts to transfer funds from. The accounts available to choose from are limited to those belonging to the end user’s primary financial institution.
-
B.) Member Name
-
In this field, the end user inputs the first three letters of the receiving member’s name. Only three characters are allowed in this field.
-
C.) Member Number
-
The end user enters the member number of the member they want to transfer funds to in this field.
-
D.) Type
-
The end user selects between Share (S) and Loan (L) to indicate the Type.
-
E.) Share/Loan #
-
The end user inputs the share or loan number for the receiving member’s account, up to four characters.
-
F.) Amount
-
The end user inputs the transfer amount in this field. There is no character limit.
Modifying Scheduled Transfers
-
Select the main menu and then select Transfer.
-
Select a transfer in the Scheduled Transfers list.
-
Choose a situation and follow the corresponding steps:
-
A.) Edit Transfer
-
Modify the desired field.
-
Select Save.
-
B.) Delete transfer
-
If iOS, select Delete. If Android, select trash icon.
Adding an Account for External Transfers
-
Select an option:
-
OPTION 1: Using the Accounts section on the dashboard:
-
Find the Accounts section on the dashboard
-
Select …
-
Select Connect an Account (Mobile App) or Connect an Institution (Online Branch).
-
OPTION 2: Using the Accounts screen:
-
In the Mobile App:
-
Select the Main Menu.
-
Select Accounts.
-
Select +
-
Select Connect an Institution.
-
In Online Branch:
-
Select Accounts from the Main Menu.
-
Select Connect Institution.
-
OPTION 3: Using the Settings screen:
-
Select Settings from the Main Menu.
-
In the Accounts section, select External Transfers.
-
Select Add an External Transfer Account or +
-
OPTION 4: Using a pre-existing external account in the app:
-
Select the Main Menu.
-
Select Settings.
-
In the Accounts section, select an External Institution.
-
Scroll to the bottom and select Add an External Transfer Account.
-
Your Institution uses multifactor security questions (MFA) to authenticate users.
-
When prompted for the security question, answer it and select Submit.
-
Your institution uses two-factor authentication.
-
When prompted for your password, enter it and select Submit.
-
Complete the fields on the Transfer Setup screen
-
Select Submit.
-
If the account is eligible to send inbound transfers to accounts in Banno Mobile, the app presents a message saying that two small deposits have been sent to the account and will arrive in 3-5 days.
-
Select OK.
-
Verify your deposit amounts to activate external transfers.
Verifying Deposits for External Transfers
-
Add an account for external transfers before completing this process:
-
Select the Main Menu, and then select Settings.
-
In the Accounts section, select External Transfers. The external transfers account list will appear.
-
Select the account that requires verification. An alert icon appears next to accounts that require attention.
-
Enter the deposit amounts, and then select Confirm. If a user inputs a wrong deposit amount three times, the app requires them to remove the account and restart the process for adding the external account.
On the Mobile App:
-
Open the hamburger menu in the top lefthand corner and select Apply for Loan
In Online Branch:
-
Select Apply for Loans from the navigation bar on the left side of your screen.
On the Mobile App:
-
Open the hamburger menu in the top lefthand corner and select Apply for Home Equity Loan
In Online Branch:
-
Select Apply for Home Equity Loan from the navigation bar on the left side of your screen.
-
Select the loan you would like to pay from the Accounts section of the Dashboard.
-
Select Pay.
-
Select the From account.
-
Access Bill Pay in one of the following three ways:
-
OPTION 1: Access bills through the Online Branch Main Menu → Select Payments from the Banno Online main menu
-
OPTION 2: Access bills through the quick actions section of the Dashboard → Select Pay a Bill in the quick actions section of the dashboard
-
OPTION 3: Access bills through the Payments section of the Dashboard → Select Pay a Bill from the payments section.
-
Select a bill to pay.
-
On the Single bill tab, complete the details in the form.
-
If a recurring payment is desired, select the Frequency field, and then fill out the corresponding field.
-
Choose an option:
-
A.) If the payment is a rush payment, it requires an address to be completed, then select Next.
-
B.) If the payment is not a rush payment, continue to the next steps.
-
Select Submit.
-
Then select OK.
-
From the dashboard select Bill Pay
-
Select Manage Payments
-
Select Payees
-
To Add a Payee, select the +Payee Button on the left side of the screen
-
To Delete a Payee, find the payee listed and select Delete

-
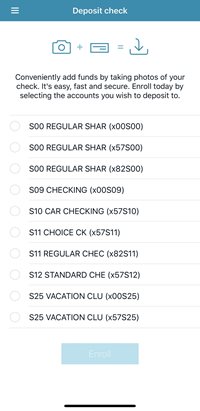
Select an option to start the enrollment process:
-
A.) Select Deposit Checks from the main Banno Online Menu
OR
-
B.) Select Deposit from the Banno Online Dashboard.
-
Select an account from the list, complete the account information necessary, and then select Enroll.
-
Select OK.
Turn your Visa Card on and Off:
-
Find the Card Management section on the dashboard.
-
Locate the desired card.
-
Select the toggle next to the card to lock or unlock it.
What to do if your Visa Card is Lost or Stolen:
-
Select Accounts > [Account Name] > Manage Cards.
-
Select the appropriate card.
-
Select Report Lost/Stolen.
-
Select Lost/Stolen.
-
When you report a card as stolen, you will no longer be able to manage the card from the mobile app.
-
Select the Share account you would like to set up alerts for.
-
From the list of options select Alert Preferences.
-
Choose to add a Balance Alert or a Transaction Alert by selecting Add Alert.
-
For Balance Alerts:
-
Choose if you want to be notified when your account reaches above or below a specific amount.
-
Select a Notify By option: Text Message, Phone Call, or In-app Message.
-
Click Add Alert.
-
For Transaction Alerts:
-
Choose if you want to be notified when your credit (deposit) or debit (withdrawal) is over a specific amount.
-
Select a Notify By option: Text Message, Phone Call, or In-app Message.
-
Click Add Alert.
-
To send a message through our new online and mobile banking system, please click the Messages button on the dashboard.
-
Type your message at the bottom of the screen where it says Type a Message.
-
You can attach documents, screenshots, and images (ex. driver's license) to your message.
-
Once your message is completed, click the arrow on send the message.
-
A representative will be in touch with you 2-4 hours during regular business hours (Mon – Fri 9:00 AM-5:00 PM EST) after your message has sent.
-
Click on the account you want to view.
-
From the list of options select eStatements.
-
Select the ellipses (...) icon on the dashboard.
-
Select Organize Dashboard.
-
Drag and drop the sections until the desired order is achieved.
-
Select Done.
Updating your address in our mobile app:
-
Open the hamburger menu and locate the Settings feature.
-
Click on your name
-
Click Edit, type in your new address and press Save.
Updating your address in Online Branch:
-
Click on your name, located at the bottom of the sidebar navigation.
-
Select Settings
-
Underneath your current address, click Edit Address, type in your new address and press Save
-
Select an account from the Accounts section on the dashboard.
-
Select Settings.
-
Next to the account name, select Rename.
-
Type the new name.
-
Select Save.
-
Select My Profile from the Main Menu.
-
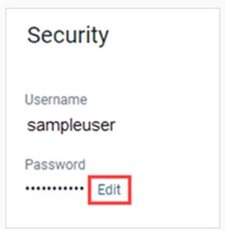
Select Settings > Security.
-
In the Password field, select Edit.
-
Enter the existing password, then enter a new password.
-
Select Save.
-
In the main menu, select My Profile.
-
Select Settings.
-
If you're in Online Branch skip to Step 4. In the mobile app, at the top of the screen you should see your full name and user name, click the >
-
Select the Edit button from the field you would like to edit.
-
Before you can edit your email or phone number, you will need to reenter your mobile banking password and select Submit.
-
Edit the necessary information and click Submit.
-
In the Accounts section pinned to the top of the Dashboard, select the ellipses (...) symbol in the right hand corner.
-
Select Connect Institution.
-
Type in the name of the financial institution, or find it in the list to Top Institutions provided
-
A relevant single-sign-on site will appear, allowing the user to complete the process for connecting another FI to their account.
-
COMING SOON you'll be able to see copies of checks you've written. We will have more updates soon.
-
Select Support from the Online Branch Main Menu
-
Click Locations to find a Shared Branch or ATM
To connect a Bank or Credit Card Account
-
Log in to your QuickBook account at https://quickbooks.intuit.com/
-
Go to the Banking menu or Transactions menu.
-
Select Connect Account on the landing page, or select Add Account or Link Account if you've already created an account.
-
Search for your bank.
-
Select Continue. Then enter the username and password you use for your bank/credit union in the pop-up window. It may take a few minutes to connect. You'll see onscreen instructions if your financial institution requires additional security steps.
-
Select the accounts you want to connect (savings, checking, or credit card) to QuickBooks.
-
For each account, select the type of account from the dropdown.
-
Select the date range for the download. Some banks download the last 90 days of transactions, others go back as far as 24 months.
-
Select Connect.
If you're having issues connecting to QuickBooks and Quicken try to disconnect and reconnect all accounts:
-
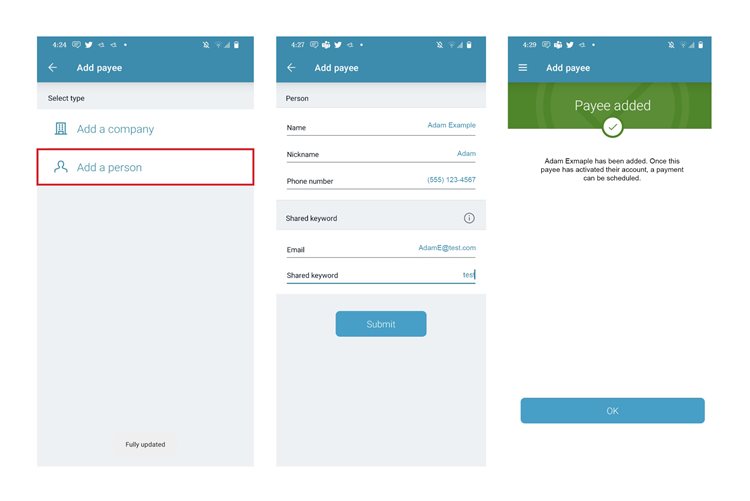
First, you need to add a Payee to your account
-
Click on Pay
-
Then, select Add a Person and fill out the required information. Important Note: You need to provide the keyword to the person you are sending it to.
-
A confirmation email will be sent to your email on file for confirmation.
-
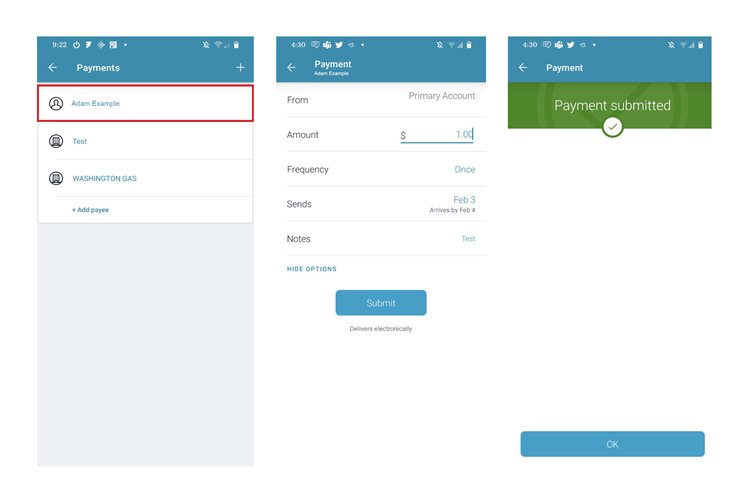
To send a payment, go to Pay and the person you added will be listed.
-
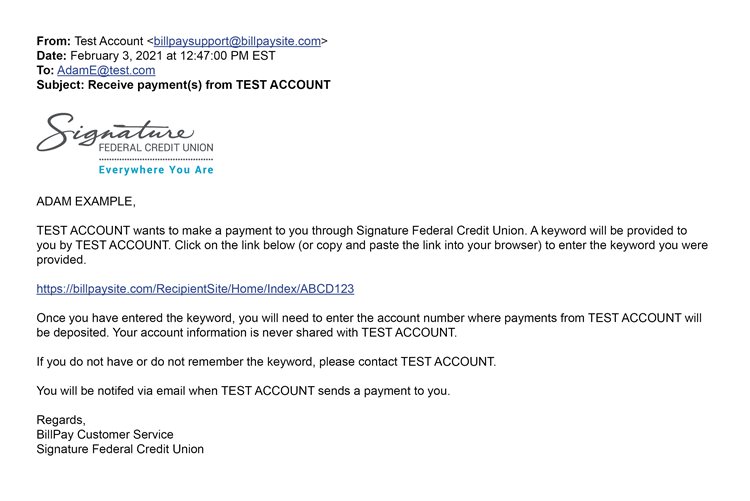
The receiving person will get an email confirmation with a link that will lead them to the payment.
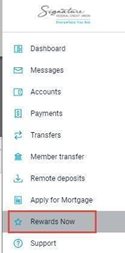
Those who have a Visa "points" card (Visa Signature "Points", Visa Platinum, Visa Debit Card Points Checking), can access their rewards account with the "Rewards Now" tab in the navigation of our Online Branch and Mobile App.
Please note, if you do not have a "points" card, you will not have access to the Rewards Now tab.
-
Click on My Profile on the bottom left corner
-
You will be redirected to a screen with an icon that says, Add an Account
-
Select the account you want to add
-
Please note, at this time you can only open Savings, Club Accounts, Money Market Accounts, Certificates (certificates not funded within 30 days will automatically close)
-
Business accounts are not eligible to add accounts through Online Branch and the Mobile app at this time.
-
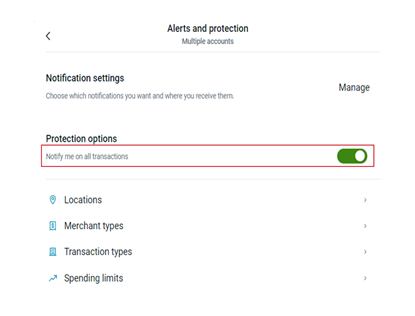
Go to Card Management and select Alerts & Protections, this will allow you to see the options to set up your alert preferences.
-
If you want to be alerted to every transaction done on your card, you'll need to toggle on the Notify Me on all Transactions under Protection Options.
-
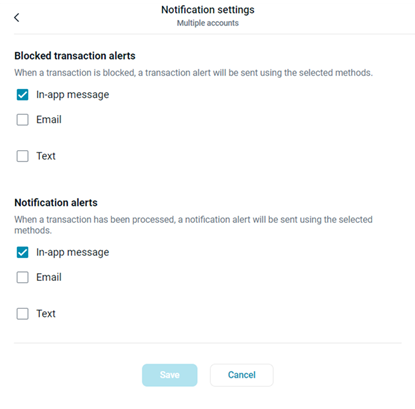
Choose how you want to receive your notifications (email, text, in-app notifications). You can select more than one option.
-
Set up alerts for certain locations, spending limits, merchant and transaction types.